Friday, September 18, 2009
QPID Software Is Now Open Source!
I've had several requests for the QPID source code and finally had some time to clean things up a bit and set up a code repository. So in case you're curious how QPID works or could borrow a code snippet for your own Arduino project, you can now access the source code on GitHub. Note that this repository only contains the QPID-specific code; the WiServer code is hosted separately in the Async Labs repo.
Wednesday, September 9, 2009
Time To Kick Things Up A Notch
Other than the lack of a real enclosure, I'm pretty satisfied with QPID at this point. It does everything I originally wanted it do, and it makes hours and hours of smoking at a precise temperature an easy, hassle free activity. Perhaps it's time to take things to a whole new level...
One of the longest-running debates in the history of food is the correct smoker temperature to use. Some people go with 225 for ribs, others say 250, while some think 200 is best. I think it's time for a little science and technology to turn this debate on its head.
I came across this very interesting (and very technical) article about sous vide cooking, which is French for 'in a vacuum'. The food is sealed in plastic in a vacuum and then slowly cooked in a water bath at a low temperature for a long period of time (sound familiar?). The article does a great job of explaining how heat affects the meat and why holding a lower temperature results in a more tender meat. The key to the whole process is keeping the temperature of the food within a precise temperature range... something that QPID could potentially do!
Sous vide employs water baths to heat the food; the higher specific heat of water allows for rapid heating of the food, and the food temperature will then mirror that of the water bath so maintaining the temperature is quite easy. I'm not about to dunk ribs in a vat of hot water, but I think the way in which the water heats the food can be approximated with some clever software.
Instead of setting the temperature of the smoker, QPID could be configured to quickly reach and hold a specific meat temperature. So perhaps the smoker would start out at 225 initially, but would then scale back to a lower temperature to keep the meat at just the right point. The hardware is already there to do this, all that's required is a little programming.
Monday, July 20, 2009
Log Data
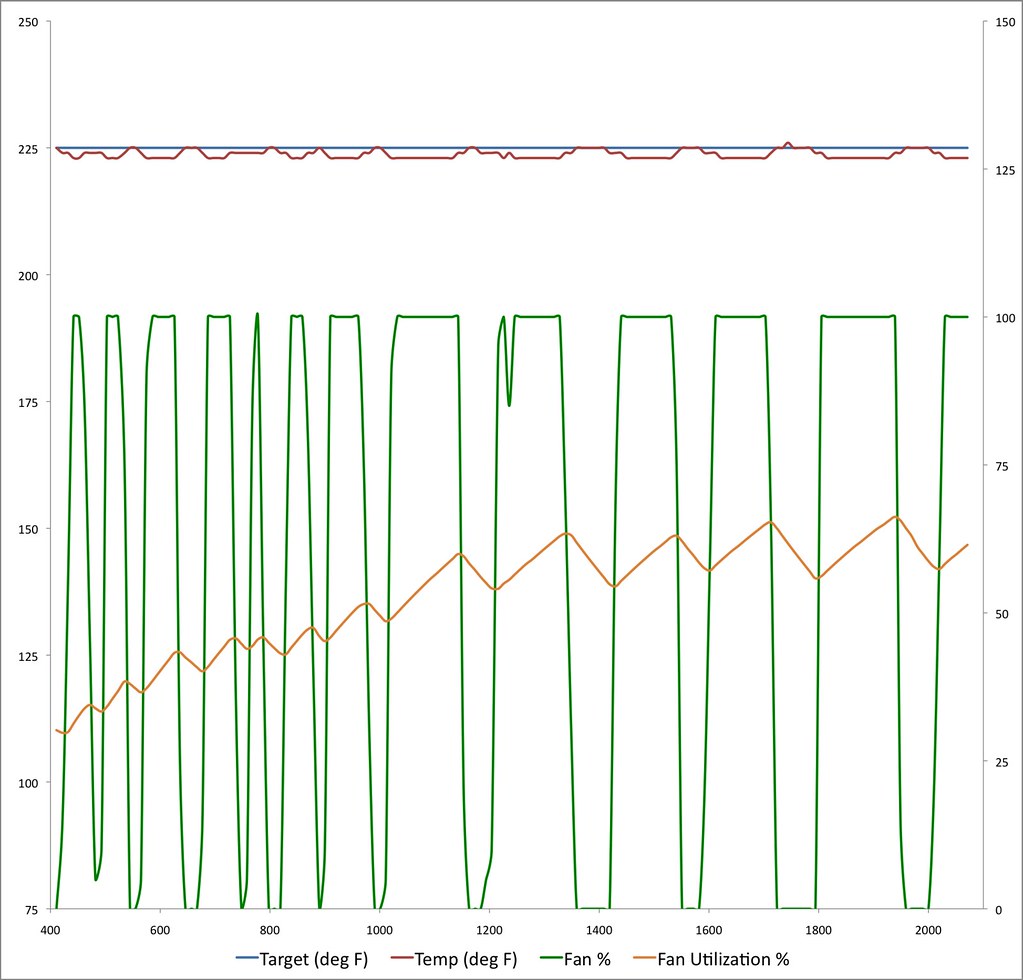
With QPID's control algorithm now running quite nicely, I logged data during a recent rib smoking to see just how good it is. Weather conditions were cool and windy, so it was a good test for the system.
The plot shows that the actual temperature (red) stays within 2 degrees of the target temperature (blue), which is way better than I could ever hope to do adjusting the dampers by hand. The green line shows how the fan speed adjusts to maintain the desired temperature.
The yellow line shows the average fan utilization gradually increasing as the fuel is consumed. The QPID software monitors this value and sends an alert when it exceeds a preset threshold. Since I'd like a little advanced warning, I think 70% would be a good value.
Wednesday, July 8, 2009
Twitter Kinda Sucks
At first I was thrilled about the prospect of using Twitter to send updates. It's free, it's easy to send updates via an HTTP POST, and it handles all of the configuration for devices and following options. But there's a catch. It's really unreliable. :-(
During the course of my testing, I've noticed that I get SMS messages about 50-60% of the time, and if the message is an urgent alert about the smoker needing attention, that's just not acceptable. So, perhaps I need to add an SMTP feature to WiServer and go straight to my carrier's gateway server instead...
On the plus side, I have greatly improved the control algorithm. It makes better use of temperate changes over time to control the fan, and it also has the capability to sense when the smoker's been opened (thus avoiding false alarms for a low fire).
Friday, June 26, 2009
WiServer Lives!
When I originally wrote the WiServer for this project, I figured it might be useful for a lot of other projects. Async Labs thought so too, so I've been working with them over the last few weeks to incorporate WiServer as part of the official WiShield software stack. Today it finally went live and is now in their GIT repository on GitHub. At this point WiServer does pretty much everything that QPID needs it to do, but I'll continue to enhance WiServer by optimizing the code and maybe adding new features.
It's not everyday that tasty bbq results new open source software...
It's not everyday that tasty bbq results new open source software...
Sunday, June 21, 2009
QPID Shield
I've finally made some 'real' hardware for QPID. I created a custom Arduino shield that includes all of the special hardware and connectors required by QPID. It includes connectors for the temperature probes, a connector and power transistor for the fan, and seven SMT LEDs on the foil side that will serve as indicator lights.
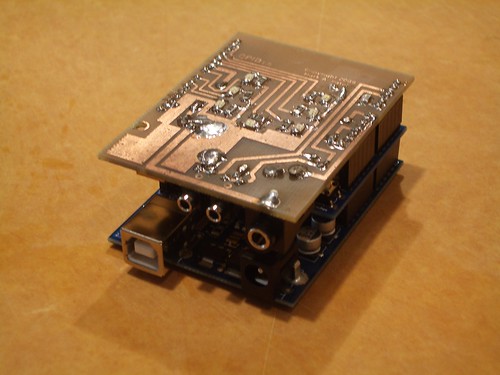
I used software provided by ExpressPCB.com to design the board and match the Arduino dimensions and header layout. It was then printed on a transparency and etched via a positive-resist process. Homemade PCBs aren't the best, but they're cheap and easy to make for prototypes like this. And it sure beats a breadboard.
I used software provided by ExpressPCB.com to design the board and match the Arduino dimensions and header layout. It was then printed on a transparency and etched via a positive-resist process. Homemade PCBs aren't the best, but they're cheap and easy to make for prototypes like this. And it sure beats a breadboard.
Sunday, June 7, 2009
The Full Slab
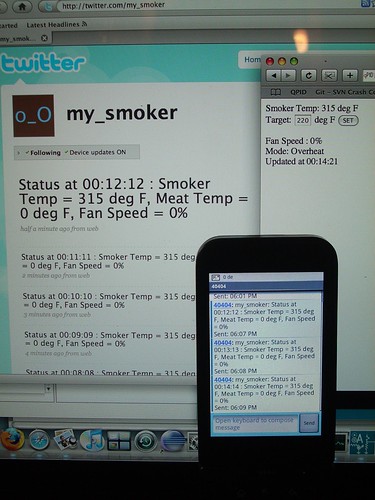
With the new stack's client mode capabilities and some new code in WiServer, QPID now has all of its communication capabilities! In addition to serving up web pages, QPID can also send periodic status updates and urgent alerts via Twitter, which in turn can be forwarded to a mobile phone via SMS. At this point I've hit about 17k out of my 30k code budget including the favicon, so there's still plenty of room for more enhancements.
I really need to build some more permanent hardware. My plan is to design a PCB that'll plug right into the headers on the WiShield, only I'll place the components on the underside except for some surface-mount LEDs. That way I can mount the entire assembly against the front surface of an enclosure and be able to view the LEDs through a window. I'll also add jacks for the temperature probes and fan, and those will align nicely with the power and USB jacks on the Arduino board.
I'll include LEDs to indicate power, Wifi connection, data transmit, data receive, and three LEDs to indicate temperature state (blue, green and red, of course). One other feature will be feed Vin to an analog input using a voltage divider; in the future I may go with a solar panel and battery pack instead of an AC adapter, so it'd nice to have a way to monitor the supply voltage... and of course tweet if it starts to get low. :-)
Friday, June 5, 2009
Stack Issue Resolved
Sure enough, the stack code was incorrectly calculating the TCP MSS value:
Re: Memory Corruption Bug Found in g2100.c
Now that the WiServer code is nice and solid, it's time to turn my attention to the hardware once again...
Re: Memory Corruption Bug Found in g2100.c
Now that the WiServer code is nice and solid, it's time to turn my attention to the hardware once again...
Thursday, June 4, 2009
Naughty, Naughty Stack
I started noticing some erratic behavior with my code, and after some digging around it looks like the WiShield stack & driver have a memory corruption issue. The default setting creates a 400 byte buffer, but then the driver code writes 417 bytes into it. Hmmm, that's not good. I submitted details to Async Labs, hopefully they can fix it soon.
In the meantime, I've set the TCP window size to 300 bytes and added a 'safey malloc' to put a little space between my data and the stack code.
In the meantime, I've set the TCP window size to 300 bytes and added a 'safey malloc' to put a little space between my data and the stack code.
Wednesday, June 3, 2009
Stress Test - Passed
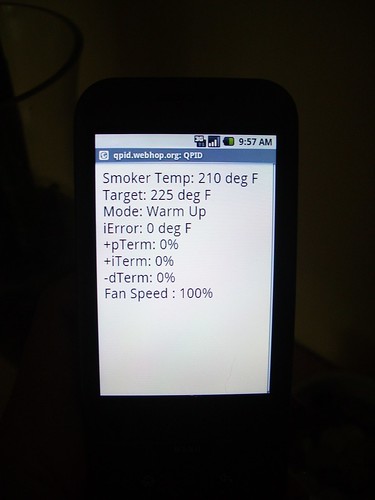
With the new stack and the WiServer up and running, I decided to give it an overnight stress test. I configured the web page to have an automatic refresh interval of 30 seconds, and then brought it up on a G1 phone browser connected via WiFi. Eight hours later it's still chugging along and reloading the page every 30 seconds. Next I'll test it with a few different browsers running on different devices, but the results of this first test are very encouraging (the old stack inevitably locked up within an hour at most).
Monday, June 1, 2009
New Stack Software, New Headaches
Over the weekend, Async Labs released a new version of the stack for their WiShield. 'New version' may not be the best choice of words because it's pretty much just 'new'; they ditched their old custom TCP stack and instead ported over uIP to work with the Wifi module. Needless to say, the WiServer code would no longer compile, let alone run. But on the bright side, the use of uIP means simultaneous support for both client and server connections, which means email alerts and tweets from my smoker will be coming soon.
Thankfully, uIP is a very stable and mature piece of open source software, and in addition to lots of comments in the code, there's also a great reference manual to explain the overall design and usage. So it took me a few hours of reading, hacking, reading again, and cursing at odd compilation errors to do an initial integration. I'm glad to report that QPID just served up its first web page using the new stack. It's messy, unstable code right now, but it works! :-)
Over the next few days I'll clean up and solidify the uIP port of WiServer, then I'll get back to working on the QPID-specific stuff.
Saturday, May 30, 2009
Software Enhancements
I've made a lot of changes to the software during the last week. For starters, I cleaned up the web server implementation and turned it into a general-purpose Arduino library named WiServer; I posted it as open source on the Async Labs website forum so that others can use it.
The code has also been optimized for RAM usage by placing lots of the web page strings in program memory. This means they do require special treatment to use them, but since that capability has been added to the WiServer's print and println methods, it's not a big deal.
I've also added new web features. You can now set the smoker target temperature via the web; I'm using GET to post the data as part of the URL, though I may add POST support to the server in the future. I've also added code to store the target temperature in EEPROM, that way it'll pick up right where it left off if board is reset. I'll probably move all of the configuration data to EEPROM, that way the code doesn't need to be updated just to change the IP address or Wifi SSID.
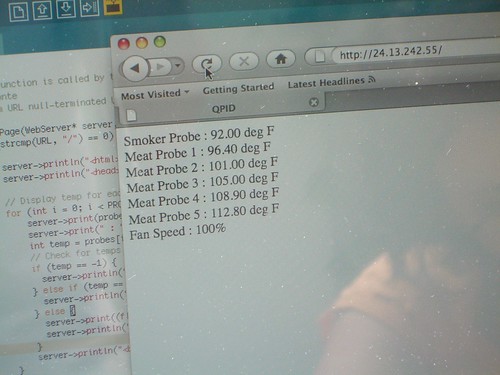
There's also support for a raw data URL that returns a comma-delimited line of text containing the current time and basic operational data of the unit. A simple bash script on my PC uses CURL to retrieve the raw data and append it to a file every 15 seconds:
for (( ; ; ))
do
curl qpid.webhop.org/data >>data.txt
sleep 15
done
I can then import the resulting text file into Excel and plot the data over time, which will be very useful for evaluating and tuning the PID algorithm.
The code has also been optimized for RAM usage by placing lots of the web page strings in program memory. This means they do require special treatment to use them, but since that capability has been added to the WiServer's print and println methods, it's not a big deal.
I've also added new web features. You can now set the smoker target temperature via the web; I'm using GET to post the data as part of the URL, though I may add POST support to the server in the future. I've also added code to store the target temperature in EEPROM, that way it'll pick up right where it left off if board is reset. I'll probably move all of the configuration data to EEPROM, that way the code doesn't need to be updated just to change the IP address or Wifi SSID.
There's also support for a raw data URL that returns a comma-delimited line of text containing the current time and basic operational data of the unit. A simple bash script on my PC uses CURL to retrieve the raw data and append it to a file every 15 seconds:
for (( ; ; ))
do
curl qpid.webhop.org/data >>data.txt
sleep 15
done
I can then import the resulting text file into Excel and plot the data over time, which will be very useful for evaluating and tuning the PID algorithm.
Sunday, May 24, 2009
First Smoke
Last night my neighbor called and informed me that we'd have an impromptu BBQ today. He would smoke a brisket, and I'd smoke 3 slabs of baby-back ribs. So I stayed up till 11pm adding a PID algorithm to the control software in preparation for today's smoke.
Today's weather conditions were very challenging for smoking. It was sunny, but cold gusty winds off Lake Michigan cooled the temperature down to around 60 and played havoc with the smoker temperature. My neighbor was fighting with his all day, but the PID algorithm worked like a charm and kept the temperature within 10 degrees of 225. I did notice quite a bit of overshoot occurring, so I'll need to run a test and log the system's impulse response to fine tune the algorithm parameters.
It was great being able to wander around and go about my business while QPID did it's thing. And the ability to check on it from my phone was really nice; for now I only have the web page implemented, but I'll add the notification feature once Async Labs adds a client mode to the WiShield's TCP stack.
And as for the ribs? They were awesome! :-)
Saturday, May 23, 2009
Test Firing
Today I hooked everything up, and fired up to smoker to see how things worked.
Everything worked well and I was able to pull up the web page and monitor the smoker.
Even with a very simple on/off control algorithm, the smoker stayed within 5 degrees of the target temperature, but I'll add a PID algorithm to improve accuracy and stability.
Everything worked well and I was able to pull up the web page and monitor the smoker.
Even with a very simple on/off control algorithm, the smoker stayed within 5 degrees of the target temperature, but I'll add a PID algorithm to improve accuracy and stability.
Friday, May 22, 2009
Smoker Hardware
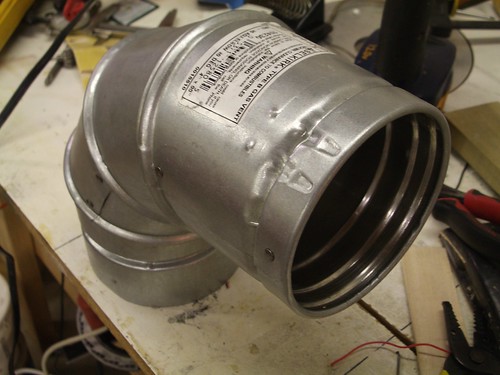
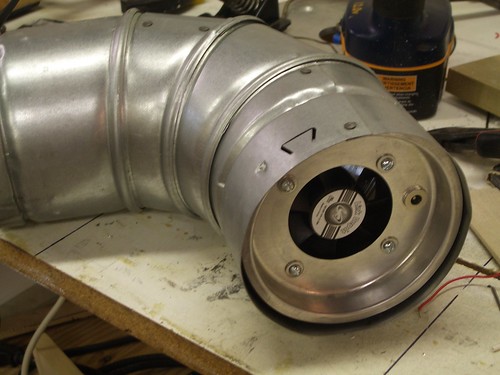
A big challenge for this project is building the hardware for the smoker firebox. I needs to be easy to attach and remove, have a tight fit to avoid air leaks, and it needs to withstand high temperatures. At Home Depot I found Type B Gas vent fittings that fit the bill perfectly. Unlike regular duct fittings, these parts are tightly constructed and are double-walled. I also picked up an end cap for mounting the fan that fits snugly into the elbow.
To mount the unit to the grill, I made use of the handle just above the damper opening. A modified conduit clip hooks over the handle and is clamped down with a wing nut. Since the clip is on the top of the unit, it's weight naturally presses against the firebox to form a good seal.
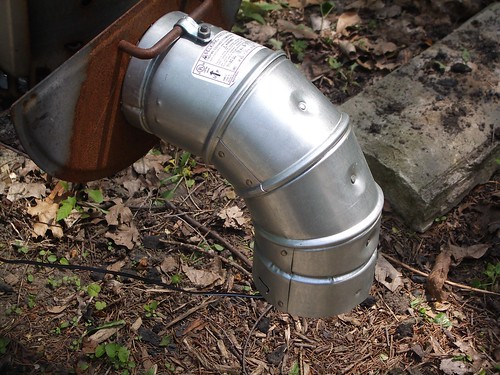
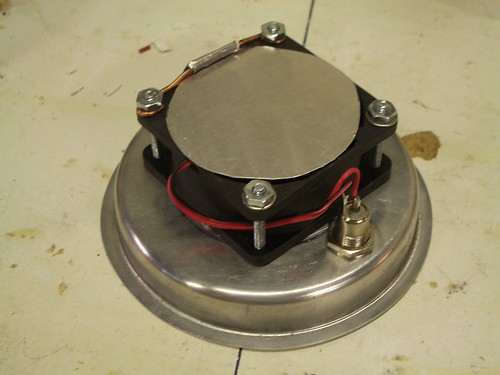
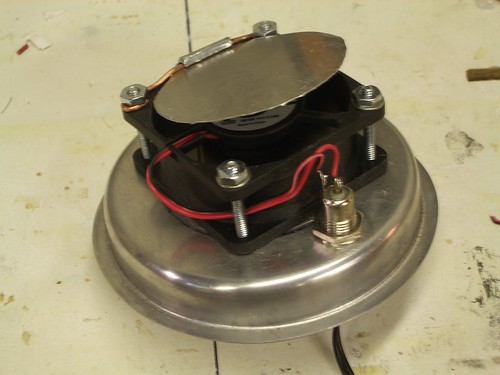
The fan unit was bolted to the end cap above a 2" hole, and I added a barrel-type power connector for connecting it to the controller.
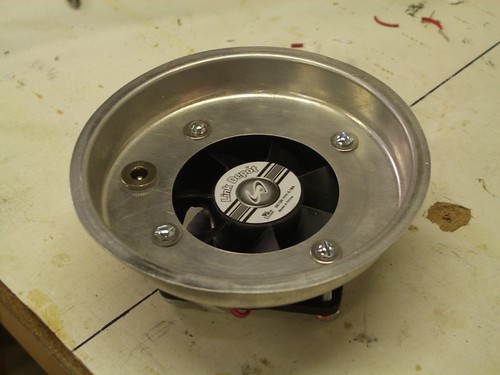
On hot, calm days, the smoker can easily maintain temperature with the damper fully closed, so I also made a simple damper for the fan. It opens to allow air flow when the fan is running, and closes when the fan is off to limit air to the fire.
The fan assembly is mounted in the bottom of the elbow to keep it far away from the intense heat of the firebox.
To mount the unit to the grill, I made use of the handle just above the damper opening. A modified conduit clip hooks over the handle and is clamped down with a wing nut. Since the clip is on the top of the unit, it's weight naturally presses against the firebox to form a good seal.
The fan unit was bolted to the end cap above a 2" hole, and I added a barrel-type power connector for connecting it to the controller.
On hot, calm days, the smoker can easily maintain temperature with the damper fully closed, so I also made a simple damper for the fan. It opens to allow air flow when the fan is running, and closes when the fan is off to limit air to the fire.
The fan assembly is mounted in the bottom of the elbow to keep it far away from the intense heat of the firebox.
Monday, May 4, 2009
Arduino Wifi Shield
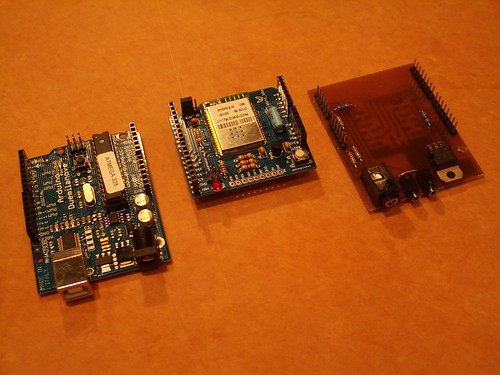
My original plan was to use a Wifi bridge in conjunction with the Arduino Ethernet shield, or perhaps hack a Wifi unit and connect to it via a serial link, but Async Labs has just released a much cleaner solution. Their WiShield mates a ZeroG wifi module to an Arduino board, and it's exactly what I need for this project.

Tuesday, April 28, 2009
The Basic Setup
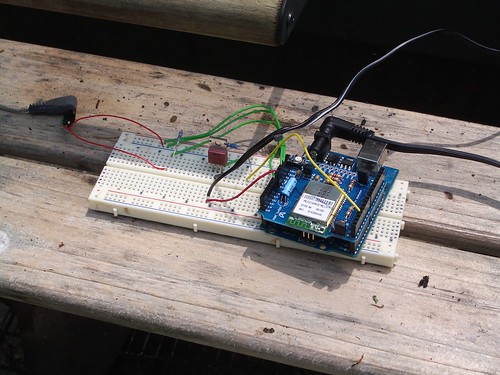
Sitting on my desk is a very rough approximation of the hardware setup. I have an Arduino Duemilanove with an Ethernet shield, and I'm using my trusty variable resistor as a simulated temperature probe (not very practical to have things on my desk at 240 degrees F). I also have a small 12vdc computer fan hooked to an NTE 241 NPN power transistor, which in turn is biased by one of the Arduino's PWM-capable pins. An old wall-wart power supply from a sump-pump backup system supplies 12vdc to the fan and the Arduino's regulator.
I started out by writing some simple code for the Arduino that tests out the basic capabilities. I can read analog values from the fake temperature probe and convert them to actual temperatures using a lookup table. I can control the fan and adjust its speed by adjusting the duty-cycle of the output pin. Then I made the system 'smart' by adjusting the fan speed to according to the temperature error value.
With the Ethernet board, I can also communicate over TCP/IP. For now it's a wired connection; once the code's all figured out, I'll add wireless capabilities either by adding a Wifi bridge or by using a Wifi module instead of the Ethernet board.
I wrote some very simple code to implement a basic web server, and I can serve up a simple web page to show basic info about the temperature and fan speed. The html includes a refresh tag so that the browser automatically reloads it every five seconds. Pretty cool. :-) Next, I'll write a bit of code to send alerts via email or Twitter.

So far I've already used about 9k of my available 30k code budget; granted, nothing's optimized yet, but I'm gonna need to write some pretty tight code to cram everything in there!
Monday, April 27, 2009
Controlling The Heat
Now that I can measure the temperature, I also need a way to control the smoker. Like most basic smokers, my Char-griller has an offset firebox with an adjustable damper; the fire has an abundance of fuel, and heat output is controlled by adjusting the amount of oxygen available.
One option would be to rig a servo motor to the damper to adjust its position. However, that would make for a pretty complicated system since the servo would have to be located far from the heat of the firebox and the linkages would need to be heat-resistant.
Another option is to use a fan to control airflow. By adjusting the speed of the fan, I could control the flow of air and the heat of the fire. Given the design of most fans, air would still be able to pass through with the fan stopped, so I'd need some sort of flap to effectively shut off the airflow.
One nice benefit of the fan approach is that I can create more airflow than I could with just an open damper, a nice bonus when the smoker needs to heat up quickly after I opened the lid to sneak a peek.
As with the servo approach, the fan will need to be protected from the heat. For that I can mount the fan at the end of a long duct, and the duct can extend down from the firebox to further minimize heat exposure.
Friday, April 24, 2009
Brains For QPID
Obviously, QPID is going to need some form of microprocessor to do what it needs to do. It also needs the ability to read voltages, control motors, and connect to the internet. Thankfully, there's an open-source hardware platform known as Arduino that fits the bill perfectly.
I decided to use the Arduino Duemilanove which is based on the Atmel ATMega328 microcontroller. It includes 6 10-bit analog-to-digital converters, 14 digital I/O lines, and is capable of generating pulse-width-modulated (PWM) signals (ideal for controlling servos and motors). And to make things even easier, an optional Ethernet board is also available along with a software library.
The Arduino platform also includes a set of open-source tools for editing, compiling, and debugging code, and it includes standard libraries for reading analog values, generating PWM signals, etc. Thus, I can spend my time working on QPID instead figuring out a proprietary toolchain and development environment.
Measuring Temperatures
Given what QPID is supposed to do, measuring temperatures is a fundamental capability. There are a variety of ways to electronically measure temperatures, but the most common methods employ either thermocouples or thermistors.
Thermocouples can be extremely accurate, but given the tiny voltages involved, they require special amplifier circuitry in order to be read by a typical analog-to-digital converter. And to make things more complicated, you also need to measure the temperature where the probe is connected to the circuitry since the voltage is dependent on the difference in temperature. Hmm, seems like a lot of work.
Thermistors are much easier to use than thermocouples. Their resistance changes with temperature, so a simple voltage divider circuit with a second resistor provides an ideal signal for the analog-to-digital converter. Their response is quite non-linear, so a lookup table is generally needed to convert readings into actual temperatures, but that's just software (which of course is easy).
Turns out the probes on my old ET73 unit are thermistor probes, so that got me thinking. They're relatively inexpensive (replacement probes can be purchased for about $10), use a standard 2.5mm plug, and they're designed specifically to measure the temperature range of a smoker. Best part is, I already have some. So I decided to use them for Project QPID.
Of course, I still needed a lookup table for the probes in order to use them. One option would be to heat or cool the probe to a known temperature and measure its resistance, but that's not easy to do without special equipment.
I realized that the ET73 unit had to know the lookup table data, I just needed a way to get that information out. Using a variable resistor hooked up to the ET73, I adjusted the resistance so that a given temperature was read. The resistor was then disconnected from the ET73 and measured using a digital multimeter. This process was repeated in 10 degree increments from 50 to 370 F degrees, thus providing a table of temperatures and corresponding resistance values.
On a long shot, I decided to also email Maverick Industries to see if by chance they could provide me with a lookup table for their probes. Suprisingly, they were very accomodating and emailed me a complete lookup table provided by their probe vendor. Many thanks to Maverick Industries for being so cool! :-)
So, how did my reverse-engineered lookup table stack up against the probe vendor's? Pretty damn close (typically with a degree or two).
What Is QPID?
A few years ago I started messing around with Texas-style BBQ (smoked ribs, brisket, turkey, etc.). It's pretty easy to do, but the tough part is having to keep a vigilant eye on the smoker and maintain a constant temperature for 7 or more hours. While it doesn't require a lot of time per se, it does mean that you need to hang around the house all day and remember to check it every 30 minutes or so. It'd be great if I could go for a bike ride, run some errands, or even take a nap.
Two years ago I got an ET73 remote temperature monitor made by Maverick Industries. It works great, but it only allows me to see the smoker temperature from inside my house due to a short-range RF link, and it still relies on me to go out and adjust the smoker. Clearly we need something more sophisticated...
The goal of Project QPID is to create an Internet-enabled controller for a my smoker that can do the following:
- Monitor and maintain the smoker at specified a temperature
- Monitor the meat temperature as it cooks
- Allow remote monitoring of the smoker via a web interface on a PC or mobile phone
- Provide updates and alerts via email, Twitter, etc. when the meat reaches a certain temperature, the fire needs attention, etc.
As for the name? Well, I expect that controlling the temperature of my BBQ may use some form of PID algorithm. And in case you're wondering, I absolutely refuse to call it 'iSmoke' or use any parts that are white. ;-)
Subscribe to:
Posts (Atom)